Thursday, August 29, 2024

xPath Cheat Sheet

XPath:

XPath stands for XML Path Language

XPath is a Selenium technique to navigate through a page's HTML structure. It enables testers to navigate any document's XML structure, which can be used on both HTML and XML documents.

XPath is a query language for selecting nodes from an XML document or for finding elements in HTML Webpage, used in most of the UI automation tools.

Types of XPATH:

  1. Absolute XPath – which starts from Root element (we use / as starting)
  2. Relative XPath – which starts from any element/ point in document (we use // as starting). Preferred as they are not complete XPath.

XPATH Attributes:

XPath can be written using attributes (eg: id, name, class)

Syntax: //tagName[@attributename]

eg: //input[@id]

XPath Operators:

There are many operators available to identify the element uniquely. Mainly used attributes are as below

=, !=, < , <=, >, >=

=,!= mostly used for text values

eg:

=: //input[text()=’test’]

!=: //input[text()!=’test’]

<, <=, >, >= are used for numerical values

eg:

<: //*[price<9]

: //*[price>65]

=: //*[price>=30]

<=: //*[price<=20]

XPath Conditions:

To identify a unique element sometimes we need to use multiple XPath’s and we need to concatenate multiple XPath’s using and/or/not

eg:

And: //*[@attribute1=’test’ and @attribute2 = ‘test3’]

Or: //*[@attribute1=’test’ or @attribute2 = ‘test3’]

Not: //*[@attribute1=’test’ or @attribute2 != ‘test3’]

Also, we can add multiple conditions to find the unique element.

XPath with indexes:

If none of the options are working to find the unique elements, we can use the indexes of the common group elements

eg: even though if we filtered 10 records after applying most possible conditions, then we need to use index as last option from 10 records

//input[@class=’yey’]/div[2]

XPath Functions:

Most common functions used to generate the XPath are text, contains, starts-with, normalize-space, last, position.

eg for text:

//input[@text=’test’]

eg for contains:

//div[contains(@class,’’)

//input[contains(text(),’test’]

eg for starts-with:

//*[starts-with(text(),’test’]

eg for normalize-space:

Normalize space will trim the spaces at start or end of the given value

//*[normalize-space(class) = ‘classname’]

//*[normalize-space(text())=’test’]

eg for last:

Using last we can get the las element of the xpath expression

(//input[@class=’yey’]/div)[last()]

eg for Position:

position in a context is not zero-based. The first node has a position of 1.

//div[@class='foo']/bar[position() = 1]

//div[@class='foo']/bar[position() >= 1]

//div[@class='foo']/bar[position() <= 1]

//div[@class='foo']/bar[position() > 10]

//div[@class='foo']/bar[position() < 10]

//div[@class='foo']/bar[position() != 1]

XPath Axes:

An axis represents the relation between the current node and to locate the node present on the tree

An XPath axe defines the node-set relative to the current (context) node. It is used to locate the node that is relative to the node on that tree.

Available axes:

‘Ancestor’ and ‘Ancestor or self’

Parent

Child

Sibling: preceding-sibling or following-sibling

‘Descendant’ and ‘Descendant or self’

Following

Preceding

Ancestor:

eg: //*[@class=’sample’]/ancestor::div – will retrieve all the nodes with div from the current node

Ancestor or self:

eg: //*[@class=’sample’]/ancestor-or-self::div – will retrieve all the nodes with div and the current node

Parent:

eg: //*[text()=’sample’]/parent::class -- will retrieve parent node from the current node

Child:

eg: //*[text()=’sample’]//child::class -- will retrieve child node from the current node

Sibling(preceding):

eg: //*[@id=’1’]/preceding-sibling::button[@name='settings'] -- will retrieve the preceding sibling of the current node

Sibling(following):

eg: //*[@id=’1’]/following-sibling::button[@name='settings'] -- will retrieve the following sibling of the current node

Descendant:

eg: //div[@class =’dou’]/descendant -- will retrieve all the following nodes from current node

Descendant or Self:

eg: //div[@class =’dou’]/descendant-or-self::a – will retrieve all the hyperlinks including current node

Following:

eg: //label[text()='value’]/following::input[1] -- will retrieve following node with input[1] from the current node

Preceding:

eg: //label[text()='Password']/preceding::input[1] -- will retrieve preceding node with input[1] from the current node

Shortcuts used in XPath:

Text()

we can use Dot(.) as shortcut to text() function

eg: //[text()=’shortcut’] ----> can be write as ----> //[.=’shortcut’]

Child

we can identify child nodes without using child key by simply writing node

eg: //[text()=’shortcut’]/Child::a ---> can be write as ----> //[text()=’shortcut’]/a

Parent

we can identify parent nodes without using parent key(using 2 Dots(..))

               eg: //*[text()=’shortcut’]/parent::div ---> can be write as ---> //*[text()=’shortcut’]/..

Descendant

We can use double forward slash(//) instead of descendant key

eg: //[text()=’shortcut’]/descendant::div ---> cab be write as ---> //[text()=’shortcut’]//div

To use below above() locator import below package import static org.openqa.selenium.support.locators.Relativelocator.*

above() relative locator

we can find the above of the current webelement

Syn: //withTagname(label).above(nameEditBox)

below() relative locator

we can find the belowof the current webelement

Syn: //withTagname(label).below(DateofBirth)

ToLeftOf() relative locator

we can find the webelement which is left of the current webelement

Syn: //withTagname(label).toleftOf(nameEditBox)

TorightOf() relative locator

we can find the webelement which is right of the current webelement

Syn: //withTagname(label).torightOf(nameEditBox)

 Refer: https://github.com/varunkapaganty/syntax-codesnippets/wiki/XPath-Learning

Scrum Words and My Understanding

Scrum Master:

  • scrum master is the facilitator for a product development team that uses scrum
  • The Scrum Master is responsible for the success of scrum.
  • Scrum Master works with customers and management to identify and institute a product owner
  • Works with management team to form scrum teams
  • He works with Scrum teams and product owner to create a product backlog for the sprint. 
  • He is responsible for conducting daily scrums, responsible for impediments are removed and decisions are promptly made, scrum master manages the process for how information is exchanged. 
  • He is responsible for working with management to gauge progress and reduce backlog.

Product Owner:
  • Product Owner is responsible for managing and controlling the product backlog.
  • In Scrum, the Product Owner is the one person ultimately responsible for the return on investment (ROI) of the product development effort. The Product Owner influences the development effort by conveying his vision to the team(s) and prioritizing the Product Backlog.
  • Product Owner is one person maintains the product backlog and his responsible that product backlog is visible to everyone.
  • The Product owner is one person, not a committee. Without a single product owner, result will be floundering, spin, contention and frustration
  • For product owner to succeed, everyone in the organization has to respect his/her decisions. No one is allowed to tell the scrum teams to work from a different set of priorities.
  • All the decisions that the product owner makes are highly visible, as they are reflected in the prioritization of the product backlog
  • This visibility requires the product owner to do his/her best and makes the role of the product owner both a demanding and a rewarding one.

Product Backlog:
  • Product Backlog is an evolving, prioritized Queue of business and technical functionality that needs to be developed into a system.
  • Scrum Master is responsible for employing the scrum process to build a system or product, the requirements are listed in product backlog
  • The Product Backlog represents everything that anyone interested in the product/ process has thought is needed or would be a good idea in the product
  • It is a list of all features, functions, technologies, enhancements and bug fixes that constitute the changes that will be made to the product for future releases.
  • Anything that represents work to be done on the product is included in product backlog.
    • eg: Improve Scalability of the product 
  • Product Backlog can originate from any sources
      • Product Marketing generates features and functions
      • Sales team
      • Engineering team
      • Customer Support team etc.,
    • Product Backlog is sorted in order of priority

    Estimation Backlog Effort:
    • As backlog is vreated, the product owner works with others to stimate how long it will take to develop. To reach the estimate he or she talks to developers/ technical writers/ quality control staff and other people who understands the product and technology
    • This estimate includes the time it takes to perform all of the requisite architectue, design, construction and testing
    • The estimate will be as accurate as the product owner and team are at estimating; this means that the accuracy may vary wildly untill the team becomes experienced at estimating. Since the team will build the backlog into code, their estimate is the best available.
    • Estimating is an iterative process estimates change as more information emerges about the backlog item and item becomes better understand.
    • The product backlog estimate is not bindling on the scrum team. The estimate doesn't mean. "this is how much time there is to build this functionality and no more".
    • The estimate is a starting point, a best guess, from which the sprint can be emperically constructed and managed.
    • The scrum team selects the amount of product backlog that it belives it can handle in a sprint based on these estimates. If the product owner hasn't worked with the team to create realistic estimates, the amount of product backlog selected may differ significantly from expectations.
    • Starting with the top priority backlog, the product owner develops estimates for each item, As the project gets underway, more will be known about available components, the utility of development tools and the capability of the team, the estimates can be revised.


    CSS Selector Cheat Sheet

    CSS Simple Selectors

    Used for selecting elements based on simple attributes like element name, ID, or class.

    • Element Selector: Selects all elements of a given type.
      • Syntax: <elementname>
      • Example: button
    • ID Selector: Selects an element with a specific ID.
      • Syntax: #<idvalue>
      • Example: #firstname
    • Class Selector: Selects all elements with a specific class.
      • Syntax: .<classname>
      • Example: .gender
    • Universal Selector: Selects all elements.
      • Syntax: *
      • Example: *


    CSS Attribute Selectors

    Used to select elements based on attributes and their values.

    • Attribute Name Selector: Selects elements with a specific attribute, regardless of its value.
      • Syntax: [attributename]
      • Example: button[placeholder]
    • Attribute Value Selector: Selects elements where the attribute has a specific value.
      • Syntax: [attributename='attribute-value']
      • Example: button[placeholder='firstname']
    • Partial Match - Whole Word (~): Matches elements whose attribute value contains a specific word.
      • Syntax: [attributename~='word']
      • Example: button[placeholder~='question']
    • Partial Match - Contains Text (*): Matches elements whose attribute value contains the specified text.
      • Syntax: [attributename*='text']
      • Example: button[placeholder*='ques']
    • Starts With - Whole Word (|): Matches elements whose attribute value starts with the specified word.
      • Syntax: [attributename|='word']
      • Example: button[placeholder|='question']
    • Starts With - Text (^): Matches elements whose attribute value starts with the specified text.
      • Syntax: [attributename^='text']
      • Example: button[placeholder^='que']
    • Ends With - Text ($): Matches elements whose attribute value ends with the specified text.
      • Syntax: [attributename$='text']
      • Example: button[placeholder$='tion']
    CSS Combinator Selectors

    Combinators define relationships between elements. These selectors allow you to select elements based on their relationships with other elements.

    • Descendant Selector: Selects all elements that are descendants of a specified element.
      • Syntax: ancestor descendant
      • Example: .container select
    • Child Selector: Selects all direct children of a specified element.
      • Syntax: parent > child
      • Example: .container > select
    • Adjacent Sibling Selector: Selects the first sibling immediately following the specified element.
      • Syntax: previous + next
      • Example: .container + select
    • General Sibling Selector: Selects all siblings following the specified element.
      • Syntax: previous ~ siblings
      • Example: .container ~ select

    CSS Conditions

    Sometimes multiple selectors are needed to identify a specific element. You can combine selectors using conditions like and, or, and not.

    • AND Condition: Selects elements that match all conditions.
      • Syntax: tagname[attribute1][attribute2]
      • Example: input[class='select'][type='major']
    • OR Condition: Selects elements that match either condition.
      • Syntax: selector1, selector2
      • Example: input[class='select'], [type='major']
    • NOT Condition: Excludes elements that match the specified condition.
      • Syntax: :not(selector)
      • Example: input.button:not([type='xbutton'])
    CSS Pseudo-Classes

    Pseudo-classes target elements based on their position or state in the document, without needing to modify the HTML structure.

    • First Child (:first-child): Selects the first child of a parent element.
      • Example: div.class:first-child
    • Last Child (:last-child): Selects the last child of a parent element.
      • Example: button:last-child
    • Nth Child (:nth-child(n)): Selects the nth child of a parent element.
      • Example: button:nth-child(3)
    • First of Type (:first-of-type): Selects the first element of its type within a parent element.
      • Example: .container > br:first-of-type
    • Last of Type (:last-of-type): Selects the last element of its type within a parent element.
      • Example: .container > br:last-of-type
    • Nth of Type (:nth-of-type(n)): Selects the nth element of its type within a parent element.
      • Example: .container > br:nth-of-type(4)
    CSS Pseudo-Elements

    Pseudo-elements are used to style specific parts of elements.

    • ::before: Adds content before the content of an element.
      • Example: button::before
    • ::after: Adds content after the content of an element.
      • Example: button::after
    • ::first-letter: Styles the first letter of the text content of an element.
      • Example: p::first-letter
    • ::first-line: Styles the first line of text in a block-level element.
      • Example: p::first-line

    Tuesday, August 16, 2016

    Unix Basics - My Learnings

    Unix (trademarked as UNIX) is a family of multitasking, multi-user computer operating systems that derive from the original AT&T Unix, developed in the 1970s at the Bell Labs research center by Ken Thompson, Dennis Ritchie, and others.

    Unix..?
    The UNIX operating system is a set of programs that act as a link between the computer and the user.
    The computer programs that allocate the system resources and coordinate all the details of the computer's internals is called the operating system or kernel.

    Users communicate with the kernel through a program known as the shell. The shell is a command line interpreter; it translates commands entered by the user and converts them into a language that is understood by the kernel.

    Few Characteristics Shared by Unix:-
    1. Simplicity
    2. Focus
    3. Reusable Components
    4. Filters
    5. Open file formats
    6. Flexibility

    H/W Requirements:-
    --> 80MB Hard Disk
    --> Atleast 4MB of RAM on a 16-bit microprocessor
    --> 4/8/16 port controller card

    In 80MB Hard Disk --> 40MB used by unix Operating System
     --> 10-20MB as Swap Space
     --> 0.75 to 1MB for terminal
     --> Unix requires amount of human support

    Sailent Features of unix:-
    Multiuser Capability - In Multi user system, the same computer resources like HD, Memory etc,. are accessible to many users
    Dumb terminals - these terminals consist of a keyboard and a display unit with no memory or disk of its own
    Terminal Emulation - The S/W that makes PC work like dumb terminal is call terminal emulation, eg: VTERM and XTALK are popularly used such S/W
    Dial-in Terminals - These terminals use telephone lines to connect with host machine these uses modem
    Multitaksing - It is capable of carrying at more than one job at the same time. In MS-Dos, multitasking is called serial multitasking
    Communication
    Security - It allows sharing of data,but not indiscriminality
    - Read, Write and Excute Permissions
    - File Encryption
    - Assigning Password and Login
    Portability - unix is H/W transperancy. Infact it is almost written entirely in C.

    Types of Shell:-
    Bourne Shell
    C Shell
    Korn Shell

    Command Syntax:-

    Command [options] [argu], Note: Option is generally precided with hyphen(-)


    Unix Architecture

    File Hierarchy

    Unix Command Categories - Basics with examples
    1. General Purpose Commands
    a. Clear Syn:- $clear
    b. WHO Syn:- $WHO[argu]
    c. Date Syn:- $date[+format]
    d. Cal Syn:- $cal[argu]
    e. Type Syn:- $type command_name
    f. PWB Syn:- $pwd
    g. MAN Syn:- $man
    2. File and Directory Commands
    a. ls Syn:- $ls [options] dir/file_name
    Options:- -a hidden files
     -l display list in long format
     -r list recursively
     -i list with inode values
    b. touch Syn:- $touch file1[file2...]  -- used to create empty files
    c. cat Syn:- Create File: $cat >filename
     Display File: $cat filename
     Append File: $cat >>filename
    Used to create files and save content in file, Display files and append the files with new extra content
    d. more Syn:- $more   -- used to display/prints content in page wise
    e. mkdir Syn:- $mkdir dir_name --used to create directories
    f. cd Syn:- $cd dir_name --used to change directory
    g. rmdir Syn:- $rmdir dir_name --used to remove directory
    h. rm Syn:- $rm file/dir_name 
     $rm file1[file2..]  --remove all the files
     $rm -r file1  --remove file recur 
     $rm -i file --remove file interactively
    i. mv Syn:- $mv src trgt --used to rename file name or move files from src to trgt
    j. cp Syn:- $cp src trgt --used to copy files from src to trgt
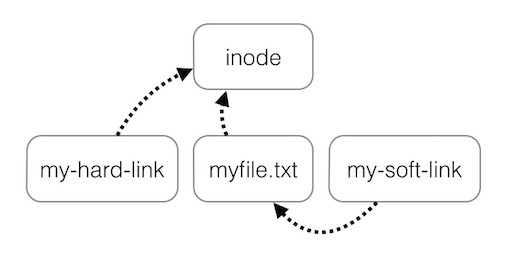
    k. ln Syn:- $ln -s src trgt --makes soft or symbolic links between files.
     $ln src trgt  --used to create hard links between files

    Hard link and Soft link


    Hard Link
    Soft Link
    Inode number is same for original and link file
    Inode number is different for the original and link file
    link will be valid if original is deleted
    link is not valid if original is deleted
    cannot be established for directories
    can be established for the directories
    for every hard link created, value of the link field is incremented by 1 for original as well as link file
    Link field value would be 1 for link file and no change in link field value of original field

    Data Streams

    In computer programming, standard streams are preconnected input and output communication ... Unix eliminated this complexity with the concept of a data stream: an ordered sequence of data bytes which can be read until the end of file.

    "stdin" --> used to input to any program or process, input streams: <, 0<

    "stdout" --> output to any program or process, output streams: >, 1>
    "stderr" --> error thrown by any program or process, error streams: 2>

    A Stream is a sequence of data bytes used to channel data into or from program or process.
    eg:- input:- $cat < file1
    output:- $cat > file1
    error:- $cat < file1 if file is not available

    Shell Metacharacters/ wild card pattern matching
    ? --> used to match any single charater
    * --> used to match zero or many characters
    [xyz] --> used to match either x or y or z
    [!xyz] --> used to match any one character except x,y,z
    [s-z]  --> used to match any character with in a range

    3. Text Processing - These commands are used to process the text
    a. wc Syn:- $wc [-lwc] filename --used to display total no of lines,words and characters in any data
    Options:- -l -->No of lines
     -w -->No of words
     -c -->No of characters

    b. Pipe sym: | --> used to send data from 1st command to 2nd command
    eg: $ls|wc -l
    c.head --used to display a set of lines of the given data from start
    Syn: $head [-n] file_name
    d. tail --used to display a set of lines of the given data from last
    Syn: $tail [-n/+n] file_name
    Options -n: No of positions from last
    +n: No of positions from nth position to last
    e. cut --used to retrieve specific fields or characters from the data
    --used on O/P of some other cmd or file
    Syn: $cmd -o/p|cut [Options..]
    eg: cut [options...] file
    options: -c: character set
    -f: field set
    -d: delimeter for field set
    f. tr --used to translate characters used on o/p of some other command
    Syn: $cmd -o/p|tr[Options..] src_charset trgt_charset

    g. sort --used to order the data
    syn: $sort[options..]file
    options: -r used to reverse
    -u used to remove duplicate
    -n numerical sort
    h. grep --used to search a pattern in given data
    Syn: $grep[options..] pattern_data
    Options: -i ignoring case
    -c print only count of no of lines
    -v print not containing
    ^pattern print starting with any pattern

    pattern$ print ending with any pattern

    File Permissions
    File ownership is an important component of UNIX that provides a secure method for storing files. Every file in UNIX has the following attributes/users -
    Owner permissions - The owner's permissions determine what actions the owner of the file can perform on the file.
    Group permissions - The group's permissions determine what actions a user, who is a member of the group that a file belongs to, can perform on the file.
    Other (world) permissions - The permissions for others indicate what action all other users can perform on the file.

    While using ls -l command it displays various information related to file permission as follows -
    $ls -l /home/amrood
    -rwxr-xr--  1 amrood   users 1024  Nov 2 00:10  myfile
    drwxr-xr--- 1 amrood   users 1024  Nov 2 00:10  mydir

    Here first column represents different access mode ie. permission associated with a file or directory.
    The permissions are broken into groups of threes, and each position in the group denotes a specific permission, in this order: read (r), write (w), execute (x) The first three characters (2-4) represent the permissions for the file's owner. For example -rwxr-xr-- represents that owner has read (r), write (w) and execute (x) permission.
    The second group of three characters (5-7) consists of the permissions for the group to which the file belongs. For example -rwxr-xr-- represents that group has read (r) and execute (x) permission but no write permission.
    The last group of three characters (8-10) represents the permissions for everyone else. For example -rwxr-xr-- represents that other world has read (r) only permission.

    File Access Modes
    The basic building blocks of Unix permissions are the read, write, and execute permissions, which are described below -
    1. Read -- Grants the capability to read ie. view the contents of the file.
    2. Write --Grants the capability to modify, or remove the content of the file.
    3. Execute --User with execute permissions can run a file as a program.

    Directory Access Modes
    Directory access modes are listed and organized in the same manner as any other file. There are a few differences to be mentioned:
    1. Read --Access to a directory means that the user can read the contents. The user can look at the filenames inside the directory.
    2. Write --Access means that the user can add or delete files to the contents of the directory.
    3. Execute --Executing a directory doesn't really make a lot of sense so think of this as a traverse permission.

    A user must have execute access to the bin directory in order to execute ls or cd command.

    Changing Permissions
    To change file or directory permissions, you use the chmod (change mode) command. There are two ways to use chmod: symbolic mode and absolute mode.

    Using chmod in Symbolic Mode
    The easiest way for a beginner to modify file or directory permissions is to use the symbolic mode. With symbolic permissions you can add, delete, or specify the permission set you want by using the operators in the following table.
    Syn:- chmod [ugoa][+-=][rwx] filename

    Using chmod in Absolute Mode
    Syn:- chmod [0-7][0-7][0-7] filename

    4. File Utility
    File Utility is to find the file in unix system

    Syn:- find [path][criteria][action] filename

    Options:
    [path] can be provided as follows
    . current directory
    .. parent directory
    ~ default home directory
    Any absoolute path
    Any relative path

    [criteria] can be given like this
    -name used to find using name of file
    -type used to find using type of file
    -links used to find using links of file
    -perm used to find using perm of file
    -size used to find using size of the file

    [action] used to perform following action on file after searching
    -print used to print the file
    -exec used to find and execute the command
    -ok used to find and execute the command interactively

    5.Compression Utilities - used to compress and decompress the files or directories
    a. gzip -used to compress and decompress the files
    syn:- $gzip file1,file1,file3... to compress the file
    Syn:- $gzip -d file1 to de-compress the file
    b. zcat -used to view compressed file
    c. zmore -used to view compressed file page-wise
    d. gunzip -used to decompress
    f. tar -used to archieve the files/directories
    g. tring -used to backup the directory/directories

    6. Process Commands
    Whenever you issue a command in UNIX, it creates, or starts, a new process. When you tried out the ls command to list directory contents, you started a process. A process, in simple terms, is an instance of a running program.
    The operating system tracks processes through a five digit ID number known as the pid or process ID . Each process in the system has a unique pid.
    Pids eventually repeat because all the possible numbers are used up and the next pid rolls or starts over. At any one time, no two processes with the same pid
    exist in the system because it is the pid that UNIX uses to track each process.

    Starting a Process
    When you start a process (run a command), there are two ways you can run it -
    Foreground Processes
    Background Processes

    a. ps --used to list all the processes
    Syn:- $ps will return the processes which are running our own process
    Syn:- $ps -f will return the processes with more information

    b. sleep --used to provide the delay of the process
    c. fg --used to bring background process to foreground
    d. kill --used to kill the process
    e. prstat --use to see all the processes with memory details
    Syn:- prstat <interval><count> -p <pid>

    Operators in Unix
    There are various operators supported by each shell. Our tutorial is based on default shell (Bourne) so we are going to cover all the important Bourne Shell operators in the tutorial.
    There are following operators which we are going to discuss -
    Arithmetic Operators.
    Relational Operators.
    Boolean Operators.
    String Operators.
    File Test Operators.
    Numeric Operators.

    The Bourne shell didn't originally have any mechanism to perform simple arithmetic but it uses external programs, either awk or the must simpler program expr.
    Here is simple example to add two numbers -
    #!/bin/sh
    val=`expr 2 + 2`
    echo "Total value : $val"
    This would produce following result -
    Total value : 4
    There are following points to note down -
    There must be spaces between operators and expressions for example 2+2 is not correct, where as it should be written as 2 + 2.
    Complete expression should be enclosed between ``, called inverted commas.

    Relational Operators
    -eq "equals to" Syn:$test Value1 -eq Value2
    -lt "less than"
    -gt "greater than"
    -le "less than or equal to"
    -ge "greater than or equal to"
    -ne "not equals to"

    Arithmetic Operators
    + --Addition Syn:- expr $a + $b
    - --Subtraction
    * --Multiplication
    / --Division
    % --Modulus
    = --Assignment
    == --Equality
    != --Not Equality

    Boolean Operators
    ! --Logical negation
    -o --Logical OR
    -a --Logical AND
    && --Conditional and operator
    || --Conditional OR operator

    String Operators
    = --String equals to or not
    != --String not equals
    -z --given string operand size is zero. If it is zero length then it returns true.
    -n --given string operand size is non-zero. If it is non-zero length then it returns true.
    str --if str is not the empty string. If it is empty then it returns false.

    File Test Operators
    -b --if file is a block special file if yes then condition becomes true.
    -c --if file is a character special file if yes then condition becomes true.
    -d --if file is a directory if yes then condition becomes true.
    -f --if file is an ordinary file as opposed to a directory or special file if yes then condition becomes true.
    -g --if file has its set group ID (SGID) bit set if yes then condition becomes true.
    -k --if file has its sticky bit set if yes then condition becomes true.
    -p --if file is a named pipe if yes then condition becomes true.
    -t --if file descriptor is open and associated with a terminal if yes then condition becomes true.
    -u --if file has its set user id (SUID) bit set if yes then condition becomes true.
    -r --if file is readable if yes then condition becomes true.
    -w --if file is writable if yes then condition becomes true.
    -x --if file is execute if yes then condition becomes true.
    -s --if file has size greater than 0 if yes then condition becomes true.
    -e --if file has size greater than 0 if yes then condition becomes true.

    Program Contructs
    Selectional -- If and Case 
    Iterational -- for, while and until

    If Statement
    Syn:- if <control command>
     then
    <commands>
     fi

     
    if-else Statement
    Syn:- if <control command>
     then
    <commands>
     else
    <commands>
     fi

     
    else-if statement
    Syn:- if <control command>
     then
    <commands>
     elif <control command>
     then
    <commands>
     fi

    case statement
    Syn:- case value in
     c1) commands ;;
     c2) commands ;;
     c3) commands ;;
     ...
     ...
     esac

    Note: value can be any expression also

    for loop statement
    Syn:- for variable_name in v1,v2,v3,v4...vn
    do
    <commands>
    done

    While loop statement
    Syn:- while <control commands>
    do
    <commands>
    done

    until loop statment
    Syn:- until <control commands>
    do
    <commands>
    done


    Wednesday, June 8, 2016

    About Ugadi Festival and Preparation of Ugadi Pachadi

    Ugadi is the New Year's Day for the people of the Telugu,and Kannada communities. This holiday is one of the most auspicious days for Telugus and Kannadigas. The Saka calendar begins with the month of Chaitra (March–April) and Ugadi marks the first day of the new year. Chaitra is the first month in Panchanga which is the Indian calendar. In some parts of India it is known as Vikram Samvat or Bhartiya Nav Varsh. This holiday is mostly prevalent in Andhra PradeshTelanganaKarnataka, and MaharashtraGudi Padwa, which is the Marathi new year, is also celebrated on the same day.

    Preparations for the festival begin a week ahead. Houses are given a thorough wash. Shopping for new clothes and buying other items that go with the requirements of the festival are done with a lot of excitement.
    On Ugadi Day, people wake up before the break of dawn and take a head bath after which they decorate the entrance of their houses with fresh mango leaves. The significance of tying mango leaves relates to a legend. It is said that Kartik (or Subramanya or Kumara Swamy) and Ganesha, the two sons of Lord Siva and Parvathi were very fond of mangoes. As the legend goes Kartik exhorted people to tie green mango leaves to the doorway signifying a good crop and general well-being.
    It is noteworthy that we use mango leaves and coconuts (as in a Kalasam, to initiate any pooja) only on auspicious occasions to propitiate gods. People also splash fresh cow dung water on the ground in front of their house and draw colorful floral designs. This is a common sight in every household. People perform the ritualistic worship to God invoking his blessings before they start off with the new year. They pray for their health, wealth and prosperity and success in business too.Ugadi is also the most auspicious time to start new ventures.
    The celebration of Ugadi is marked by religious zeal and social merriment. Special dishes are prepared for the occasion. In Andhra Pradesh and Telangana, eatables such as "pulihora, bobbatlu (Bhakshalu/ polelu/ oligalu) and Pachadi" and preparations made with raw mango go well with the occasion.
    Ugadi pachchadi is a dish synonymous with Ugadi. It is made of new jaggery, raw mango pieces, neem flowers, and new tamarind which truly reflect life — a combination of six different tastes (sweet, sour, spice, salt, tangy, and bitter) symbolizing happiness, disgust, anger, fear, surprise, and sadness.

    Ingredients and preparation as below

    Ingredients (Mandatory)
    1 ½ cup water
    2 tbsp. peeled and chopped raw mango pieces
    Few neem sprigs with flowers or 1 tbsp. flowers
    Generous pinch salt or as needed
    3 tbsp. Jaggery as needed
    One generous pinch pepper powder
    Tamarind as needed or 1 tsp tamarind pulp


    Ingredients (Optional)
    fried gram
    Cashews chopped
    Raisins
    Grapes chopped
    Chunks of ripe banana

    Preparation:
    1. Wash tamarind and soak it in ½ cup warm water till it softens.
    2. Meanwhile, pluck the flowers from neem sprigs. Or alternate quick method: add the neem sprigs to a thin cloth, bring the edges of the cloth together so that they don’t fall off from the cloth. Hold the edges tightly and hit the cloth on to the kitchen counter several times. Neem flower or petals get separated from the sprigs and fall of in the cloth, collect them and set aside.
    Add grated jaggery to another one cup water, stir till it melts off. Filter it through a coffee strainer to another bowl, filter the tamarind pulp or water as well to the same bowl.

    Add rest of the ingredients. Mix well.